How to write kafka producer and consumer using spring boot in kotlin

Introduction
Apache Kafka is an open-source distributed event streaming platform used to build real-time data pipelines and streaming applications. It is horizontally scalable, fault-tolerant, and fast, making it a popular choice for building real-time streaming applications.
In this tutorial, we will show see how to use Spring Boot to create a simple Kafka application.
Setting up Spring boot application
Use https://start.spring.io/ to create the basic spring boot project.
Make sure to include these two dependencies
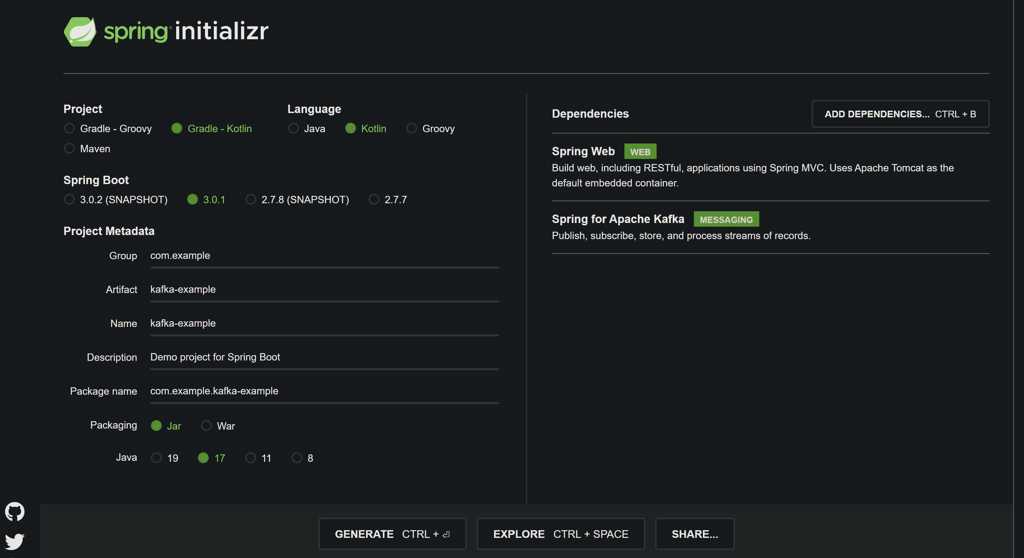
Download and extract the project. Open in your favourite IDE ( I am using IntelliJ IDEA).
Setting up Kafka and Zookeeper
You need to go to the link https://kafka.apache.org/downloads to download the latest kafka. I downloaded the latest binary scala 2.13 version here.
Unzip the package and go the the extracted kafka folder
If you feel stuck with setting up kafka and zookeeper, you can follow https://medium.com/@abhikulshrestha22/understanding-kafka-components-using-cli-436f7d494644 for a better understanding.
Run the following command to start the zookeeper in windows and mac respectively
.\\bin\\windows\\zookeeper-server-start.bat .\\config\\zookeeper.properties
bin/zookeeper-server-start config/zookeeper.properties
2. To start kafka broker in windows and mac run these commands respectively
.\\bin\\windows\\kafka-server-start.bat .\\config\\server.properties
bin/kafka-server-start config/server.properties
Configuring kafka properties in the application
Open application.properties and add the following properties
spring.kafka.bootstrap-servers=localhost:9092
spring.kafka.producer.key-serializer=org.apache.kafka.common.serialization.StringSerializer
spring.kafka.producer.value-serializer=org.apache.kafka.common.serialization.StringSerializer

spring.kafka.consumer.group-id=myGroup
spring.kafka.consumer.key-deserializer=org.apache.kafka.common.serialization.StringDeserializer
spring.kafka.consumer.value-deserializer=org.apache.kafka.common.serialization.StringDeserializer
The bootstrap-servers property specifies the connection details for our Kafka cluster.
The key-serializer and value-serializer properties specify the serializers to use when sending messages to Kafka. In this case, we are using the default StringSerializer for both the key and value.
The group-id property specifies the consumer group that our application will be a part of, and the key-deserializer and value-deserializer properties specify the deserializers to use for the key and value of the message.
Create Topic
To keep using the same topic name everywhere, create a static variable.
class AppConstants {
    companion object {
        const val TOPIC_NAME = "KAFKA-TOPIC"
    }
}
Create KafkaConfig file to create the topic using TopicBuilder
@Configuration
class KafkaConfig {
    @Bean
    fun topicCreate(): NewTopic {
        return TopicBuilder.name(AppConstants.TOPIC_NAME).build()
    }
}
Create KafkaProducer
Create a service KafkaProducer used to call out kafkaTemplate to send the data.
@Service
class KafkaProducer(val kafkaTemplate: KafkaTemplate<String, String>) {
fun sendEvent(message: String) {
        kafkaTemplate.send(AppConstants.TOPIC_NAME,message)
    }
}
The KafkaTemplate wraps a producer and provides convenience methods to send data to Kafka topics.
Create Controller to use service KafkaProducer
This controller is basically used to trigger the sendEvent function of KafkaProducer. We inject the kafkaProducer form the constructor.
@RestController
class KafkaController(val kafkaProducer: KafkaProducer){

    @GetMapping("/event")
    fun sendKafkaEvent(@RequestParam("msg") msg: String): ResponseEntity<String> {
        kafkaProducer.sendEvent(msg)
        return ResponseEntity("Message sent by kafka", HttpStatus.OK)
    }
}
On sending GET request in form of
http://localhost:8080/event?msg=abc
where “abc” is the desired message. The Producer will send the message to kafka
Create KafkaConsumer
The @KafkaListenerannotation is used to designate a bean method as a listener for a listener container. We can set different configuration like topics, groupid with this.
@RestController
class KafkaController(val kafkaProducer: KafkaProducer){

    @GetMapping("/event")
    fun sendKafkaEvent(@RequestParam("msg") msg: String): ResponseEntity<String> {
        kafkaProducer.sendEvent(msg)
        return ResponseEntity("Message sent by kafka", HttpStatus.OK)
    }
}
That’s it. Now when you use GET request http://localhost:8080/event?msg=abc, you can see the log appearing from the KafkaConsumer listen method.
I hope you find this article helpful. For more such articles please follow, upvote and share this with friends. 😁✌️